Creating First ASP.NET MVC Application
Back to: ASP.NET MVC Tutorial
Creating First ASP.NET MVC Application using Visual Studio
In this article, I am going to discuss how to create the first ASP.NET MVC Application step by step from scratch using Visual Studio 2015. You can use any version as per your choice but the step will remain the same. Please read our previous article before proceeding to this article where we gave a brief introduction to ASP.NET MVC Framework.
Creating the first ASP.NET MVC Application:
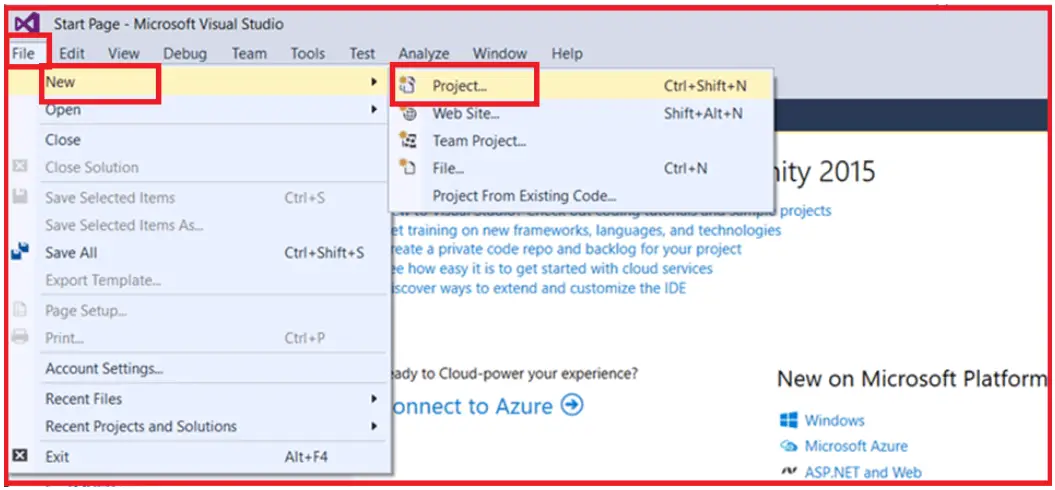
First of all, open the Visual Studio and then click on the New Project link which appeared on the Startup page. An alternative approach to creating an application is to select the File => New =>Project option as shown in the below image.

From the New Project dialog window, from the left pane select the Web option under the Visual C# which is under the “Installed – Templates” section. From the middle pane select ASP.NET Web Application. Name your project as FirstMVCApplication (you can give any name to your application). Change the location where you want to create the application by clicking on the Browse button. Finally, click on the OK button as shown in the image below.

Once you click on the OK button, then a new dialog window will open with the name New ASP.NET Web Application for selecting the Project Templates. From this window select the MVC project template. Then Change the Authentication type to No Authentication. Finally, click on the OK button as shown in the below image.

To change the authentication, you just need to click on the Change Authentication button. Then it will open the following popup. From that popup select the appropriate authentication mode. As we don’t want to use any authentication for this demo, so select the No Authentication radio button and click on the OK button as shown below.

Once you click on the OK button, it will take some time to create the project for us with the following default folder structure.

Running the ASP.NET MVC Application:
If you want to run the project with debug mode then just press F5. On the other hand, if you want to run the application without debugging then just Press Ctrl + F5. Once you run the application, it will open the following page in the browser.

The ASP.NET MVC 5 framework includes the necessary JavaScript and CSS files that are required for bootstrap by default to create a responsive web page. The responsive web page means, the looks and feels of the web page will be changed based on the screen size of the devices on which we are running the application. For example, if you run the application on a mobile device, then the top menu bar will be changed as shown in the below image.

That’s it. We have done creating our first ASP.NET MVC application from scratch using Visual Studio 2015. In the next article, I am going to discuss the Folder Structure of the ASP.NET MVC Application. Here, in this article, I try to explain how to create the first ASP.NET MVC Application step by step from scratch using Visual Studio 2015. I hope this article will help you with your needs. I would like to have your feedback. Please post your feedback, question, or comments about this article.
